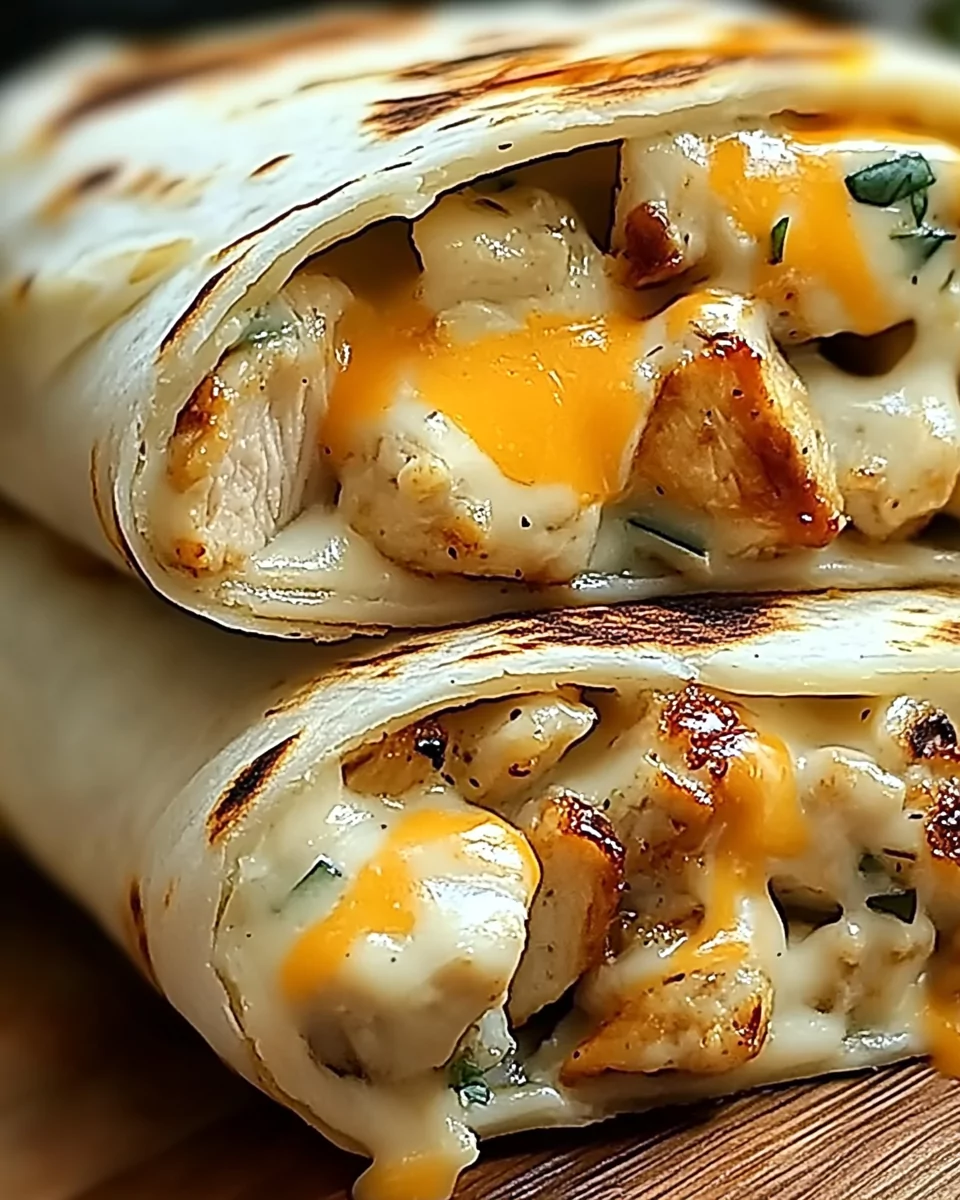
Craving a meal that’s quick, satisfying, and bursting with flavor? Cheesy Garlic Chicken Wraps are your answer! With tender, seasoned chicken, melted cheddar and mozzarella cheeses, and a creamy garlic sauce, all encased in a warm, crispy tortilla, this recipe checks all the boxes. Whether you’re whipping up lunch, dinner, or a hearty snack, these wraps are sure to be a hit with the entire family.
Grab This Chef Knife Now - Almost Gone!
- Stays Razor-Sharp: Ice-hardened blade keeps its edge longer than ordinary knives
- Superior Grip Control: Unique finger hole design gives you perfect balance and safety
- Built to Last a Lifetime: Premium stainless steel blade with elegant beech wood handle
Customer Reviews ★★★★★
Why You’ll Love This Recipe
- Bursting with Flavor: The perfect balance of savory chicken, rich cheese, and garlic sauce.
- Versatile Meal Option: Ideal for a quick weekday meal or an on-the-go snack.
- Customizable: Adjust the spices or make it vegetarian with tofu or veggies.
- Crowd-Pleasing Appeal: Loved by kids and adults alike.
Preparation Phase & Tools to Use
Essential Tools and Equipment
- Non-stick skillet: For cooking the chicken and toasting the wraps evenly.
- Mixing bowl: To season and coat the chicken perfectly.
- Spatula: Helps to flip the wraps without breaking them.
- Sharp knife: For slicing the wraps neatly.
Importance of Each Tool
- The non-stick skillet ensures that the wraps get a golden, crispy exterior without sticking.
- A mixing bowl makes seasoning the chicken mess-free and efficient.
- Using a spatula allows gentle pressing for even browning.
- A sharp knife provides clean, professional-looking wrap slices.
Preparation Tips
- Use fresh, high-quality chicken for the best flavor and texture.
- Bring your tortillas to room temperature to prevent cracking during folding.
- Measure and prep all ingredients before you start cooking for a seamless process.
Ingredients You’ll Need
For the Chicken:
- 2 large chicken breasts, diced
- 1 tablespoon olive oil
- 2 teaspoons garlic powder
- 1 teaspoon onion powder
- 1 teaspoon paprika
- Salt and pepper, to taste
For Assembly:
- 4 large flour tortillas
- 1 cup shredded cheddar cheese
- 1/2 cup shredded mozzarella cheese
- 1/2 cup creamy garlic sauce
- Fresh parsley, chopped (optional garnish)
Step-by-Step Directions
1. Season the Chicken
- In a large bowl, combine diced chicken, olive oil, garlic powder, onion powder, paprika, salt, and pepper.
- Mix well until the chicken is evenly coated with the seasoning blend.
2. Cook the Chicken
- Heat a non-stick skillet over medium heat.
- Add the seasoned chicken and cook for 6-8 minutes, stirring occasionally, until golden brown and fully cooked.
- Remove the chicken from the skillet and set aside.
3. Assemble the Wraps
- Lay a tortilla flat on a clean surface.
- Spread 1-2 tablespoons of creamy garlic sauce over the tortilla.
- Add a portion of the cooked chicken and sprinkle with cheddar and mozzarella cheeses.
- Repeat with the remaining tortillas.
4. Cook the Wraps
- Fold each tortilla into a wrap by tucking in the sides and rolling tightly.
- Heat the skillet again over medium heat.
- Place each wrap seam-side down in the skillet.
- Cook for 2-3 minutes per side, pressing gently with a spatula, until golden brown and the cheese is melted.
5. Serve and Enjoy
- Slice each wrap diagonally for easier handling.
- Garnish with fresh parsley if desired and serve warm.
Tips and Variations
- Extra Crispy Wraps: Use a bit of butter or oil in the skillet before toasting.
- Make-Ahead Option: Prep the chicken ahead of time and store in the fridge for up to 2 days.
- Vegetarian Twist: Swap chicken for sautéed mushrooms, bell peppers, or tofu.
Serving Suggestions
- Classic Pairing: Serve with a side of fresh salad or crispy French fries.
- Dipping Delight: Offer extra creamy garlic sauce or a tangy marinara sauce for dipping.
- Brunch Option: Pair with scrambled eggs and hash browns for a hearty morning meal.
- On-the-Go Snack: Wrap in foil for a mess-free, portable lunch or picnic option.
Common Mistakes to Avoid & How to Perfect the Recipe
Mistake 1: Overfilling the Wraps
- Solution: Stick to recommended filling amounts to prevent tearing during cooking.
Mistake 2: Skipping the Rest Time for Chicken
- Solution: Let cooked chicken rest for 3-5 minutes before assembly to lock in juices.
Mistake 3: Using Cold Tortillas
- Solution: Bring tortillas to room temperature or warm slightly for easier folding.
Mistake 4: Burning the Wraps
- Solution: Cook on medium heat and press gently for even toasting without scorching.
Mistake 5: Uneven Cheese Melting
Side Dish Recommendations
Pair your Cheesy Garlic Chicken Wraps with these side dishes for a well-rounded and satisfying meal.
1. Fresh Garden Salad
- Toss crisp lettuce, cherry tomatoes, cucumbers, and red onions with a light vinaigrette for a refreshing balance to the wraps’ richness.
2. Garlic Parmesan Fries
- Season crispy fries with garlic powder, Parmesan cheese, and parsley for a flavor-packed side.
3. Roasted Vegetables
- Roast a mix of zucchini, bell peppers, and carrots with olive oil and Italian seasoning.
4. Creamy Coleslaw
- The cool, tangy crunch of coleslaw complements the warm, cheesy wraps beautifully.
5. Tomato Basil Soup
- Serve a bowl of hearty tomato basil soup on the side for a comforting pairing.
6. Mexican Rice
- Add a flavorful twist with Mexican-style rice seasoned with tomato, cumin, and fresh cilantro.
7. Sweet Potato Wedges
- Roast sweet potato wedges with cinnamon and paprika for a sweet and savory contrast.
8. Mozzarella Sticks
- Double down on cheesy goodness with crispy, gooey mozzarella sticks as a snackable side.
Pro Tips for Side Dishes
- Match the intensity of the wraps with lighter or complementary flavors.
- Opt for sides that are easy to prepare while the wraps cook, like salads or pre-made fries.
- Make it a theme! For example, pair the wraps with Mexican rice and salsa for a Tex-Mex twist.
Recipe Tips
- Customizing Flavors:
- Swap the cheddar and mozzarella for pepper jack or Gouda for a new twist.
- Add sautéed onions or bell peppers for extra flavor and texture.
- Healthier Alternatives:
- Use whole wheat or low-carb tortillas.
- Replace the garlic sauce with Greek yogurt mixed with minced garlic for a lighter option.
- Meal Prep-Friendly:
- Pre-cook the chicken and store it in the refrigerator for quick assembly later.
- Assemble the wraps but don’t cook them; refrigerate and toast fresh before serving.
- Kid-Friendly Adaptations:
- Omit stronger spices like paprika for younger palates.
- Add a layer of ketchup or barbecue sauce for a kid-approved flavor.
Storage and Reheating Instructions
Storing Leftovers
- Wrap each prepared wrap tightly in foil or plastic wrap.
- Store in an airtight container in the refrigerator for up to 3 days.
Freezing
- Assemble the wraps but do not toast them.
- Wrap individually in plastic wrap, then foil.
- Freeze for up to 3 months.
Reheating
- From the Refrigerator:
- From the Freezer:
- Thaw in the refrigerator overnight.
- Follow the skillet or oven reheating method.
Frequently Asked Questions (FAQs)
1. Can I make these wraps vegetarian?
Absolutely! Replace the chicken with tofu, roasted chickpeas, or a medley of sautéed vegetables like zucchini, mushrooms, and bell peppers.
2. What if I don’t have garlic sauce?
You can make a quick alternative by mixing mayonnaise, minced garlic, and a squeeze of lemon juice.
3. Can I use corn tortillas instead of flour?
Yes, but corn tortillas are smaller and less flexible. Warm them first to make folding easier.
4. How do I prevent the wraps from getting soggy?
Make sure the chicken is not too wet and let it cool slightly before assembling. Also, use a moderate amount of sauce.
5. Can I make this recipe gluten-free?
Simply use gluten-free tortillas and check that all seasonings and sauces are certified gluten-free.
6. What’s the best way to keep wraps warm for a party?
Wrap them in foil and keep them in a warm oven (around 200°F or 90°C) until ready to serve.
Conclusion
Cheesy Garlic Chicken Wraps are the ultimate comfort food—packed with flavor, easy to make, and endlessly versatile. Whether you’re indulging in a quick solo meal or preparing a feast for family and friends, these wraps are guaranteed to impress. Pair them with your favorite sides, experiment with flavors, and enjoy the satisfaction of crafting this delightful dish.
For more delicious recipes and inspiration, check out our other guides and explore new ways to elevate your kitchen skills. Happy cooking!
Cheesy Garlic Chicken Wraps
Ingredients
For the Chicken:
- 2 large chicken breasts diced
- 1 tablespoon olive oil
- 2 teaspoons garlic powder
- 1 teaspoon onion powder
- 1 teaspoon paprika
- Salt and pepper to taste
For Assembly:
- 4 large flour tortillas
- 1 cup shredded cheddar cheese
- 1/2 cup shredded mozzarella cheese
- 1/2 cup creamy garlic sauce
- Fresh parsley chopped (optional garnish)
Instructions
- Season the chicken: In a large bowl, mix diced chicken with olive oil, garlic powder, onion powder, paprika, salt, and pepper until all pieces are evenly coated.
- Cook the chicken: Heat a non-stick skillet over medium heat. Add the seasoned chicken and cook for 6-8 minutes, stirring occasionally, until fully cooked and browned. Remove the chicken from the skillet and set aside.
- Assemble the wraps: Lay each tortilla flat on a clean surface. Spread 1-2 tablespoons of garlic sauce evenly over each tortilla. Divide the cooked chicken evenly among the tortillas, then sprinkle with the shredded cheddar and mozzarella cheeses.
- Serve: Remove the wraps from the skillet and slice them diagonally. Garnish with fresh parsley, if desired, and serve immediately.
Notes
Avoid overfilling the wraps to prevent splitting during cooking.
Gently press the wraps with a spatula while cooking for even browning.
For a vegetarian option, substitute chicken with tofu or sautéed vegetables.

Leave a Comment