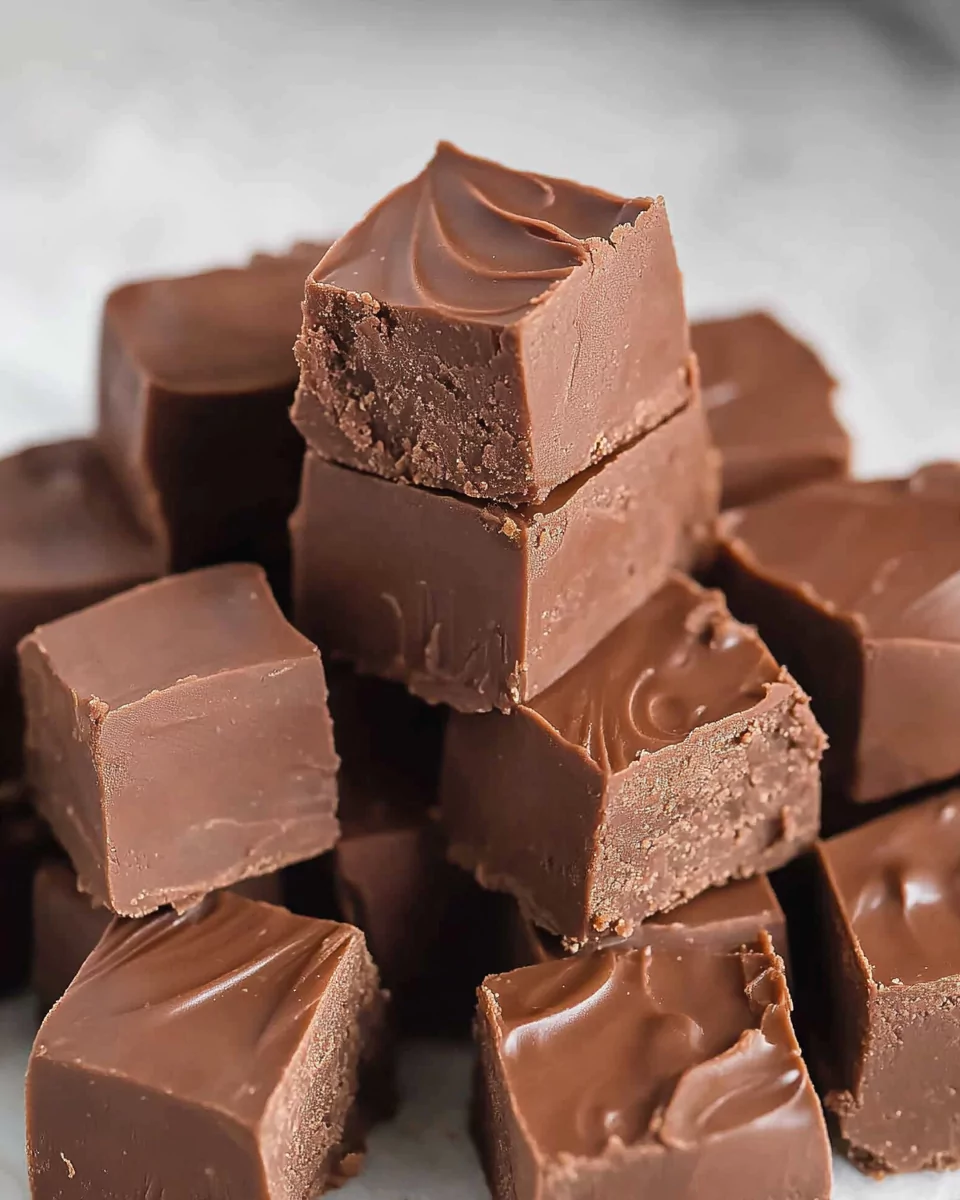
Nothing beats the rich, creamy texture of Old Fashioned Hershey Cocoa Fudge. This recipe has stood the test of time, offering a perfect balance of sweetness and deep cocoa flavor. Whether you’re crafting a batch for holiday gifting or indulging your sweet tooth, this fudge is a treat that delivers nostalgia and decadence in every bite.
Grab This Chef Knife Now - Almost Gone!
- Stays Razor-Sharp: Ice-hardened blade keeps its edge longer than ordinary knives
- Superior Grip Control: Unique finger hole design gives you perfect balance and safety
- Built to Last a Lifetime: Premium stainless steel blade with elegant beech wood handle
Customer Reviews ★★★★★
Why You’ll Love This Recipe
- Made with pantry staples.
- Perfect for gifting or sharing at parties.
- Beginner-friendly and foolproof with our step-by-step guide.
Preparation Phase & Tools to Use
Essential Tools and Equipment
- Large saucepan: Distributes heat evenly, preventing scorching.
- Candy thermometer: Ensures precise cooking to reach the soft-ball stage.
- Wooden spoon: Ideal for mixing and beating without damaging cookware.
- 8×8-inch square pan: Shapes the fudge into perfectly sized squares.
- Parchment paper or cooking spray: Keeps the fudge from sticking.
Importance of Each Tool
- Candy Thermometer: Ensures perfect consistency; no guesswork needed.
- Wooden Spoon: Offers control while beating to achieve the right texture.
- Square Pan: Makes even pieces, ideal for serving or gifting.
Preparation Tips
- Organize Ingredients: Measure all ingredients beforehand to streamline the process.
- Line Your Pan: Use parchment paper or lightly grease your pan before starting.
- Avoid Premature Stirring: Once the mixture begins to boil, resist stirring to avoid crystallization.
Ingredients
- 2/3 cup Hershey’s cocoa powder
- 3 cups granulated sugar
- 1/8 teaspoon salt
- 1 1/2 cups whole milk
- 1/4 cup unsalted butter, softened
- 1 teaspoon vanilla extract
Step-by-Step Directions
1. Prepare the Pan
- Line an 8×8-inch square pan with parchment paper or lightly grease it. Set it aside.
2. Mix the Dry Ingredients
- In a large saucepan, whisk together the Hershey’s cocoa powder, sugar, and salt until well combined.
3. Add the Milk
- Gradually pour in the whole milk while stirring to create a smooth mixture.
4. Heat the Mixture
- Place the saucepan over medium heat. Stir constantly until the mixture begins to boil.
5. Boil to the Soft-Ball Stage
- Once boiling, stop stirring. Let the mixture cook undisturbed until it reaches 234°F on a candy thermometer.
- No thermometer? Drop a bit of the mixture into a bowl of cold water. If it forms a soft, malleable ball, it’s ready.
6. Add Butter and Vanilla
- Remove the saucepan from heat. Stir in the softened butter and vanilla extract. Do not mix further at this point.
7. Cool to Lukewarm
- Allow the fudge mixture to cool undisturbed to about 110°F. This step is crucial for achieving the proper texture.
8. Beat the Fudge
- Once cooled, beat the mixture vigorously with a wooden spoon. Continue until it thickens, loses its gloss, and starts to hold its shape.
9. Pour and Spread
10. Cool Completely
- Let the fudge set at room temperature until firm.
11. Cut and Serve
- Once firm, cut the fudge into 25 squares. Serve or store as desired.
Key Tips for Success
- Don’t Skip the Thermometer: Accurate temperature control is essential for the perfect consistency.
- Beat with Care: Overbeating can cause the fudge to become crumbly. Stop when it thickens and looks creamy.
- Work Quickly: Once the fudge starts to set, transfer it to the pan immediately.
Enjoy this timeless Old Fashioned Hershey Cocoa Fudge and share the joy of homemade sweetness!
Serving Suggestions
Elevate your fudge experience with these creative serving ideas. Whether you’re indulging alone or sharing with loved ones, these suggestions make every bite unforgettable.
- Classic Dessert Platter: Arrange fudge squares on a decorative tray alongside fresh fruit or nuts.
- Elegant Pairings: Serve with espresso or a glass of milk for a timeless treat.
- Party Favorites: Wrap each piece in decorative wax paper for party favors or gifts.
- Holiday-Themed Delight: Add colorful sprinkles or drizzle with melted white chocolate for festive occasions.
Common Mistakes to Avoid & How to Perfect the Recipe
Even simple recipes can have their challenges. Avoid these common mistakes to achieve flawless fudge every time.
1. Skipping the Thermometer
- Why it matters: Without a thermometer, it’s easy to miss the soft-ball stage, resulting in fudge that’s either too runny or too firm.
- Solution: Invest in a candy thermometer or master the cold-water test for accuracy.
2. Overstirring After Boiling
- Why it matters: Stirring while boiling can cause sugar crystals to form, making the fudge grainy.
- Solution: Stir only until the mixture begins to boil, then leave it undisturbed.
3. Not Cooling Properly Before Beating
- Why it matters: Beating the fudge while it’s too hot can prevent it from setting correctly.
- Solution: Let the mixture cool to about 110°F before beating for the perfect texture.
4. Overbeating the Mixture
- Why it matters: Overbeating can lead to a dry, crumbly texture.
- Solution: Stop beating as soon as the fudge thickens, loses its shine, and starts holding its shape.
Side Dish Recommendations
Pair your Old Fashioned Hershey Cocoa Fudge with complementary sides to create a complete dessert experience.
1. Vanilla Ice Cream
- The creamy, cold contrast highlights the rich chocolate flavor of the fudge.
2. Fresh Strawberries
- Their natural sweetness and acidity balance the richness of the fudge.
3. Hot Coffee or Espresso
- The bold bitterness of coffee enhances the sweetness of the fudge.
4. Whipped Cream
- Add a dollop of lightly sweetened whipped cream for an airy pairing.
5. Mixed Nuts
- Serve a side of roasted almonds, pecans, or hazelnuts for added crunch and nutty flavor.
6. Mint Tea
- A refreshing, light beverage that complements the indulgent chocolate taste.
7. Chocolate Sauce Drizzle
- For the ultimate chocoholic, drizzle melted dark chocolate over the fudge pieces before serving.
8. Caramel Popcorn
- Sweet and salty popcorn adds a fun and crunchy contrast to the smooth fudge.
Recipe Tips
Perfecting Old Fashioned Hershey Cocoa Fudge requires attention to detail. Here are some expert tips to ensure your fudge turns out flawless every time.
- Use Room Temperature Butter: Softened butter blends more easily into the mixture, ensuring a smooth texture.
- Don’t Skip the Cooling Step: Allow the fudge mixture to cool to the specified temperature before beating to achieve the signature creamy consistency.
- Work Quickly When Spreading: Once the fudge thickens, transfer it to the pan immediately, as it will set rapidly.
- Experiment with Add-ins: Customize your fudge with chopped nuts, crushed candies, or a swirl of peanut butter for extra flavor and texture.
Storage and Reheating Instructions
Proper storage keeps your fudge fresh and delicious for days or even weeks.
Short-Term Storage
- At Room Temperature: Store the fudge in an airtight container at room temperature for up to 1 week. Place wax paper between layers to prevent sticking.
Long-Term Storage
- In the Refrigerator: For extended freshness, refrigerate the fudge in an airtight container for up to 2 weeks. Let it come to room temperature before serving for optimal texture.
- In the Freezer: Wrap each piece in parchment paper or plastic wrap, then place in a freezer-safe container. Freeze for up to 3 months. Thaw at room temperature before serving.
FAQs
Here are answers to common questions about making and enjoying Old Fashioned Hershey Cocoa Fudge.
1. Can I use a milk substitute?
Yes! Whole milk delivers the best creaminess, but alternatives like evaporated milk, almond milk, or coconut milk can work. Keep in mind, the flavor and texture may vary slightly.
2. What happens if I don’t have a candy thermometer?
You can use the cold water test. Drop a small amount of the mixture into cold water. If it forms a soft, pliable ball, it has reached the correct temperature.
3. Why is my fudge grainy?
Grainy fudge typically results from over-stirring or sugar crystals forming during cooking. Ensure you stir only until the mixture begins to boil, and avoid scraping the sides of the pan into the mixture.
4. Can I make this recipe without butter?
Butter adds richness and smoothness, but you can substitute with margarine or omit it for a slightly firmer texture.
5. How can I make my fudge softer?
For softer fudge, cook it to a slightly lower temperature, such as 230°F, and add a splash of cream during the mixing stage.
6. Can I double the recipe?
Yes, but ensure you use a larger pan and allow extra time for the mixture to cool. Stir and heat evenly to avoid overcooking.
7. Is there a way to fix overcooked fudge?
If your fudge is too hard, reheat it gently with a few tablespoons of milk, then beat it again to restore its texture.
8. Can I add flavors or toppings?
Absolutely! Mix in peppermint extract, sprinkle crushed candy canes, or top with sea salt for a gourmet twist.
Conclusion
Old Fashioned Hershey Cocoa Fudge is more than just a dessert—it’s a tradition. From its rich, chocolaty flavor to its silky-smooth texture, this recipe is a beloved classic for a reason. Follow these tips, serving suggestions, and storage instructions to make every batch a success. Whether you’re making it for yourself, your family, or as a thoughtful gift, this fudge is sure to bring joy to any occasion.
Try it today, and experience the timeless magic of homemade fudge!


Leave a Comment