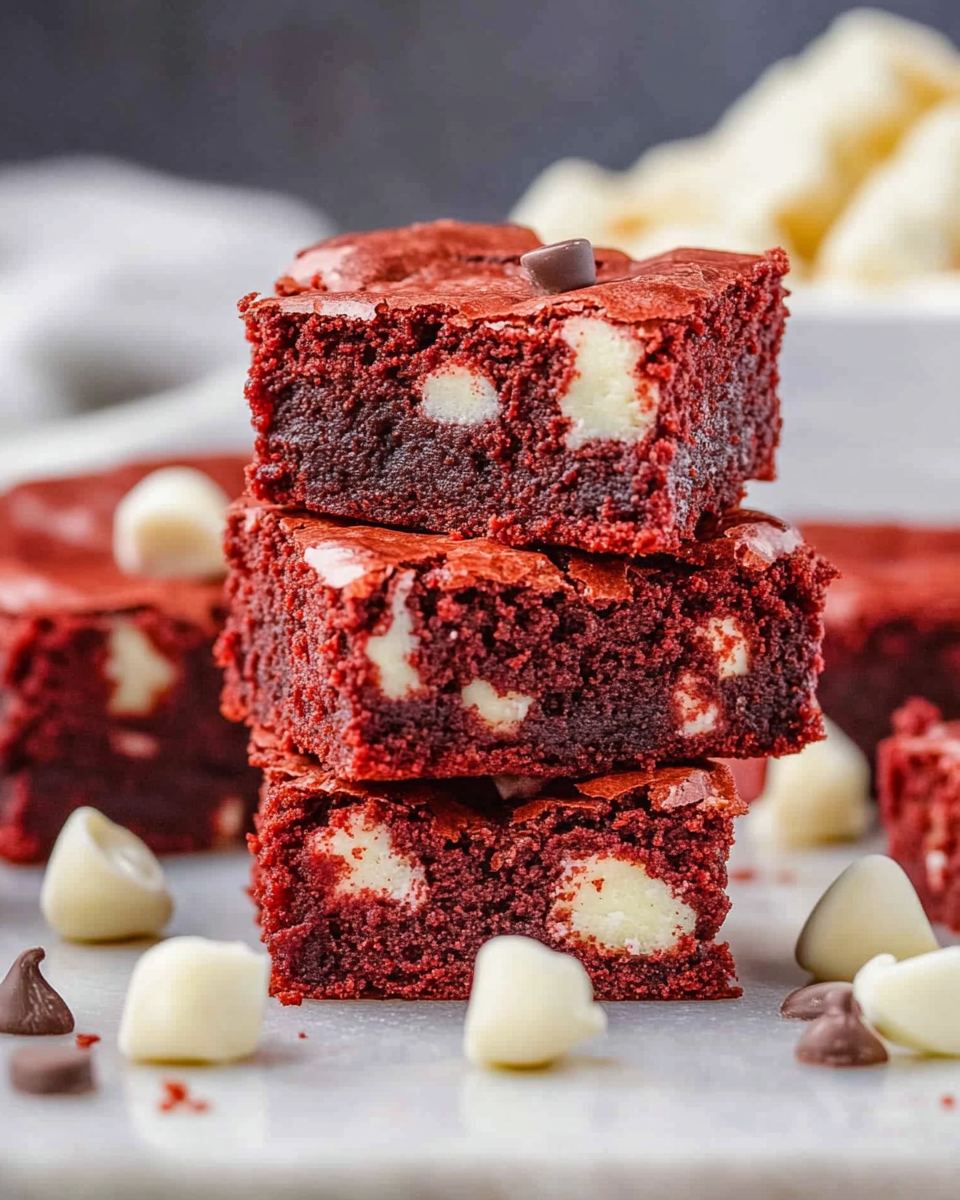
Red Velvet Brownies are the ultimate dessert for anyone who loves the rich taste of cocoa paired with a vibrant pop of color. These brownies take the iconic red velvet flavor and transform it into a dense, fudgy bar that’s perfect for special occasions—or any time you’re craving a sweet treat that’s as beautiful as it is delicious.
Grab This Chef Knife Now - Almost Gone!
- Stays Razor-Sharp: Ice-hardened blade keeps its edge longer than ordinary knives
- Superior Grip Control: Unique finger hole design gives you perfect balance and safety
- Built to Last a Lifetime: Premium stainless steel blade with elegant beech wood handle
Customer Reviews ★★★★★
Unlike traditional brownies that rely solely on dark chocolate, these bars get their flavor from a mix of unsweetened cocoa powder, a touch of vanilla, and a splash of white vinegar that brings out the subtle tanginess characteristic of classic red velvet. What sets them apart even more is the addition of white chocolate chips, which offer a creamy contrast and make every bite rich and satisfying.
Why You’ll Love This Recipe
- One-bowl prep and minimal mess
- Gorgeous color makes them perfect for holidays like Valentine’s Day and Christmas
- Rich and chewy texture with a soft center
- Easy to customize with your favorite mix-ins or toppings
- A hit with both kids and adults
Whether you’re preparing a dessert tray, celebrating a birthday, or just want a showstopping treat, these red velvet brownies are guaranteed to impress.
Preparation Phase & Tools to Use
Before diving into the mixing and baking, make sure your kitchen is prepped for success. This recipe is simple but benefits from some thoughtful setup.
Recommended Tools and Equipment
- 9×9-inch baking pan – ensures even baking and optimal brownie thickness
- Parchment paper – makes removing brownies clean and easy
- Mixing bowl – a large bowl to hold all your ingredients
- Whisk or spatula – for thorough mixing
- Measuring cups and spoons – accuracy is key to achieving the right texture
Why Each Tool Matters
Using a square baking pan helps create the classic brownie shape and provides even heat distribution. Parchment paper prevents sticking and makes cleanup a breeze. A whisk ensures your batter is smooth and lump-free, while accurate measuring tools help balance moisture and dryness for that perfect fudgy consistency.
Preparation Tips
- Preheat your oven to 350°F (175°C) for even baking.
- Line your pan with parchment paper, allowing some to hang over the edges for easy lifting.
- Use high-quality cocoa powder and white chocolate chips for the best flavor.
- Add food coloring gradually. You want a bold red without overdoing it—too much can affect taste.
- Don’t overmix the batter after adding the flour. This can create a cakier texture instead of the desired chewiness.
Ingredients
Here’s what you’ll need for this indulgent recipe:
- 12 tablespoons unsalted butter, melted
- 5 tablespoons unsweetened cocoa powder
- ½ teaspoon table salt
- 1¼ cups granulated sugar
- 3 large eggs
- ¾ teaspoon vanilla extract
- ¾ teaspoon white vinegar
- 1 cup all-purpose flour
- 10–12 drops Wilton red food coloring, adjusted to your preference
- 1 cup white chocolate chips, divided in half
Step-by-Step Directions
- Preheat your oven to 350°F (175°C). Line a 9×9-inch baking pan with parchment paper and spray it with nonstick spray.
- In a large mixing bowl, combine melted butter, cocoa powder, salt, and sugar. Whisk until well-blended.
- Add the eggs, vanilla extract, and vinegar. Mix until smooth.
- Slowly fold in the flour. Before it’s fully combined, begin adding red food coloring, drop by drop, until you reach your desired hue.
- Gently fold in ½ cup of white chocolate chips.
- Pour the batter into the prepared pan and smooth the top.
- Sprinkle the remaining ½ cup white chocolate chips evenly over the surface.
- Bake for 22–25 minutes, or until a toothpick inserted in the center comes out with a few moist crumbs.
- Allow the brownies to cool in the pan for at least 1 hour before slicing.
Quick Tips
- If using gel-based food coloring, you’ll need fewer drops for the same vibrant color.
- To achieve sharp, clean slices, chill the brownies for 30 minutes before cutting.
- These brownies taste even better the next day once the flavors have melded.
How to Serve Red Velvet Brownies
Once your Red Velvet Brownies are fully cooled and sliced, it’s time to serve them in a way that highlights their bold flavor and vibrant color. While these brownies are delicious on their own, there are many creative ways to elevate the presentation and taste.
Simple and Elegant
- Serve chilled or at room temperature for the ideal texture—firm yet chewy.
- For a cleaner appearance, slice them into neat squares using a warm, sharp knife.
- Lightly dust with powdered sugar for an elegant finish.
Party-Ready Presentation
- Use a cookie cutter to cut heart-shaped brownies for Valentine’s Day or anniversaries.
- Stack brownie squares and tie them with twine for an attractive edible gift.
- Drizzle with melted white chocolate or cream cheese glaze for added sweetness and visual appeal.
Common Mistakes to Avoid
Even the best bakers can make small errors that affect the outcome of their brownies. To ensure perfect results every time, steer clear of the following issues.
Overmixing the Batter
Once you add the flour, mix just until the dry ingredients are incorporated. Overmixing can lead to a dense, cake-like texture instead of the desired fudgy center.
Adding Too Much Food Coloring
More is not always better. Excess food coloring can introduce a bitter aftertaste and affect the brownie’s moisture balance. Start with a small amount and adjust gradually.
Overbaking
These brownies are meant to be soft and slightly gooey in the center. Bake just until a toothpick comes out with a few moist crumbs. Overbaking will result in a dry texture and diminished color vibrancy.
Skipping the Parchment Paper
Parchment makes it easy to lift brownies from the pan without sticking. Without it, you risk crumbling edges and uneven slicing.
Not Cooling Before Cutting
It’s tempting to dig in right away, but allowing the brownies to cool completely helps them set and results in cleaner cuts. Cutting too soon can lead to messy, underbaked-looking centers.
How to Perfect Your Red Velvet Brownies
Want bakery-quality results? These tips will help you master the details.
Use Quality Ingredients
- Choose high-quality cocoa powder for a deep chocolate flavor.
- Premium white chocolate chips melt better and add a richer taste.
Customize the Texture
- For an ultra-gooey center, bake closer to 22 minutes.
- For firmer, more sliceable bars, aim for 25 minutes and allow extra cooling time.
Experiment With Add-Ins
- Cream cheese swirls can add a tangy, cheesecake-like contrast.
- Add chopped nuts like pecans or walnuts for extra crunch.
- Mix in dark chocolate chunks for more depth of flavor.
Use Gel Food Coloring
Gel food coloring is more concentrated than liquid, so you’ll need less. This helps maintain the brownie’s texture while achieving a bold red hue.
Best Side Dishes to Serve With Red Velvet Brownies
Pairing Red Velvet Brownies with the right side dish can enhance the overall dessert experience. Whether you’re building a dessert board or crafting a holiday menu, here are eight delicious ideas.
1. Vanilla Bean Ice Cream
The classic combination of warm brownies and cold ice cream never fails. The creaminess balances the cocoa notes and complements the white chocolate chips.
2. Fresh Berries
Strawberries, raspberries, or blueberries add a refreshing contrast and vibrant color that complements the red velvet theme.
3. Whipped Cream
Light and fluffy whipped cream adds a delicate sweetness without overpowering the dense brownie texture.
4. Espresso or Coffee
The bitterness of coffee contrasts beautifully with the rich, sweet flavor of the brownies. Serve alongside as a dessert beverage pairing.
5. Hot Chocolate
If you’re serving these during the colder months, a mug of thick, creamy hot chocolate enhances the indulgent factor.
6. Chocolate Sauce Drizzle
A simple chocolate ganache or sauce poured over a brownie square can turn it into a restaurant-quality dessert.
7. Fruit Salad
A bright fruit salad provides a lighter, healthier option to accompany the richness of the brownies.
8. Milkshakes or Smoothies
For a fun, family-friendly twist, pair brownies with a vanilla or strawberry milkshake. The cold drink cuts through the richness and adds a playful touch.
Pro Tips and Delicious Variations
While the base recipe for Red Velvet Brownies is already rich and satisfying, a few expert touches can elevate them to bakery-level quality. These tips and variations will help you adapt the recipe to suit different preferences and dietary needs.
Make Them Extra Fudgy
- Use room temperature eggs to help the batter blend more smoothly.
- Don’t skip the vinegar—it helps develop the unique red velvet flavor and enhances texture.
- Let the batter rest for 5 minutes before baking to allow the flour to hydrate, creating a more uniform crumb.
Add Flavor Twists
- Cream cheese swirl: Drop spoonfuls of sweetened cream cheese on top of the batter, then swirl with a knife before baking.
- Nutty crunch: Fold in chopped pecans or walnuts for texture and contrast.
- Espresso kick: Add 1 teaspoon of instant espresso powder to deepen the chocolate flavor.
Make it Festive
- Top with crushed peppermint candies for a holiday twist.
- Add themed sprinkles before baking for parties or celebrations.
- Use heart-shaped cookie cutters for Valentine’s Day treats.
Adaptations for Dietary Needs
- Gluten-free: Use a 1:1 gluten-free baking flour in place of all-purpose flour.
- Dairy-free: Replace butter with a plant-based alternative and use dairy-free white chocolate chips.
- Vegan: Use flax eggs (1 tbsp flaxseed meal + 3 tbsp water per egg), vegan butter, and dairy-free chips.
Storage and Reheating Instructions
Proper storage ensures your Red Velvet Brownies stay fresh and delicious for days. Whether you want to enjoy them over time or prep ahead for an event, these tips will help maintain their taste and texture.
Storing at Room Temperature
- Place fully cooled brownies in an airtight container.
- Store in a cool, dry place away from sunlight.
- They will stay fresh for up to 3 days at room temperature.
Storing in the Refrigerator
- Store in a sealed container to prevent drying out.
- Refrigerated brownies stay fresh for up to 7 days.
- Allow them to come to room temperature before serving for best flavor and texture.
Freezing Instructions
- Wrap each brownie individually in plastic wrap.
- Place wrapped brownies in a zip-top freezer bag or airtight container.
- Freeze for up to 2 months.
- To serve, thaw at room temperature for 1–2 hours or warm gently in the microwave.
Reheating Tips
- For a warm, gooey treat, microwave a brownie for 10–15 seconds.
- Top with a scoop of vanilla ice cream after reheating for a dessert upgrade.
Frequently Asked Questions
What makes red velvet brownies red?
The red color comes from a combination of red food coloring and the reaction between cocoa powder, vinegar, and baking ingredients. Gel or concentrated liquid food coloring works best for vibrant results.
Can I make red velvet brownies without food coloring?
Yes, you can skip the coloring, but the visual appeal will change. Some people opt for natural alternatives like beet powder or pomegranate juice, but these may alter the flavor and texture slightly.
Do red velvet brownies taste like chocolate?
Red velvet has a mild chocolate flavor from the cocoa powder, but it’s more subtle than a traditional brownie. The tang from vinegar and richness of the butter balance it out.
Can I use Dutch-processed cocoa powder?
It’s best to use natural unsweetened cocoa powder, which reacts with vinegar to enhance the red velvet flavor. Dutch-processed cocoa may alter the texture and color.
How do I know when red velvet brownies are done?
Check by inserting a toothpick into the center. If it comes out with a few moist crumbs, they are ready. The center should be set but still slightly soft for a fudgy result.
Why did my brownies turn out dry?
Overbaking is the most common cause. Remove them from the oven as soon as the center is set and the edges begin to pull away from the pan. Also, be sure to measure ingredients accurately.
Can I double the recipe?
Yes, double all ingredients and bake in a 9×13-inch pan. Add a few minutes to the baking time and keep an eye on the center for doneness.
Final Thoughts
Red Velvet Brownies are the perfect combination of striking appearance, rich cocoa flavor, and soft, chewy texture. With simple ingredients and easy-to-follow steps, this recipe is ideal for both beginner and experienced bakers. Whether you’re preparing them for a special occasion or just want to indulge in something sweet, these brownies never disappoint.
Explore variations, pair them with your favorite sides, and don’t be afraid to get creative. From casual snacking to elegant entertaining, these red velvet brownies will become a staple in your dessert lineup.
For more dessert ideas, check out our Easy Brownie Recipes and Valentine’s Day Desserts collections.
Red Velvet Brownies
Ingredients
- 12 tablespoons unsalted butter melted
- 5 tablespoons unsweetened cocoa powder
- ½ teaspoon table salt
- 1¼ cups granulated sugar
- 3 eggs
- ¾ teaspoon vanilla extract
- ¾ teaspoon white vinegar
- 1 cup all-purpose flour
- 10 –12 drops Wilton red food coloring adjust to desired color
- 1 cup white chocolate chips divided
Instructions
- Preheat the oven to 350°F (175°C). Line a 9×9-inch baking pan with parchment paper and spray with nonstick cooking spray.
- In a large bowl, whisk together the melted butter, cocoa powder, salt, and sugar until fully combined.
- Add the eggs, vanilla extract, and vinegar. Mix until the batter is smooth.
- Gently fold in the flour. Before fully incorporating the flour, add 7 drops of red food coloring, then continue adding drops until the desired red color is reached.
- Fold in ½ cup of the white chocolate chips.
- Pour the batter into the prepared baking pan and smooth the top evenly.
- Sprinkle the remaining ½ cup of white chocolate chips evenly over the top of the batter.
- Bake for 22–25 minutes, or until a toothpick inserted into the center comes out with a few moist crumbs.
- Allow the brownies to cool in the pan for at least 1 hour before slicing into squares and serving.


Leave a Comment