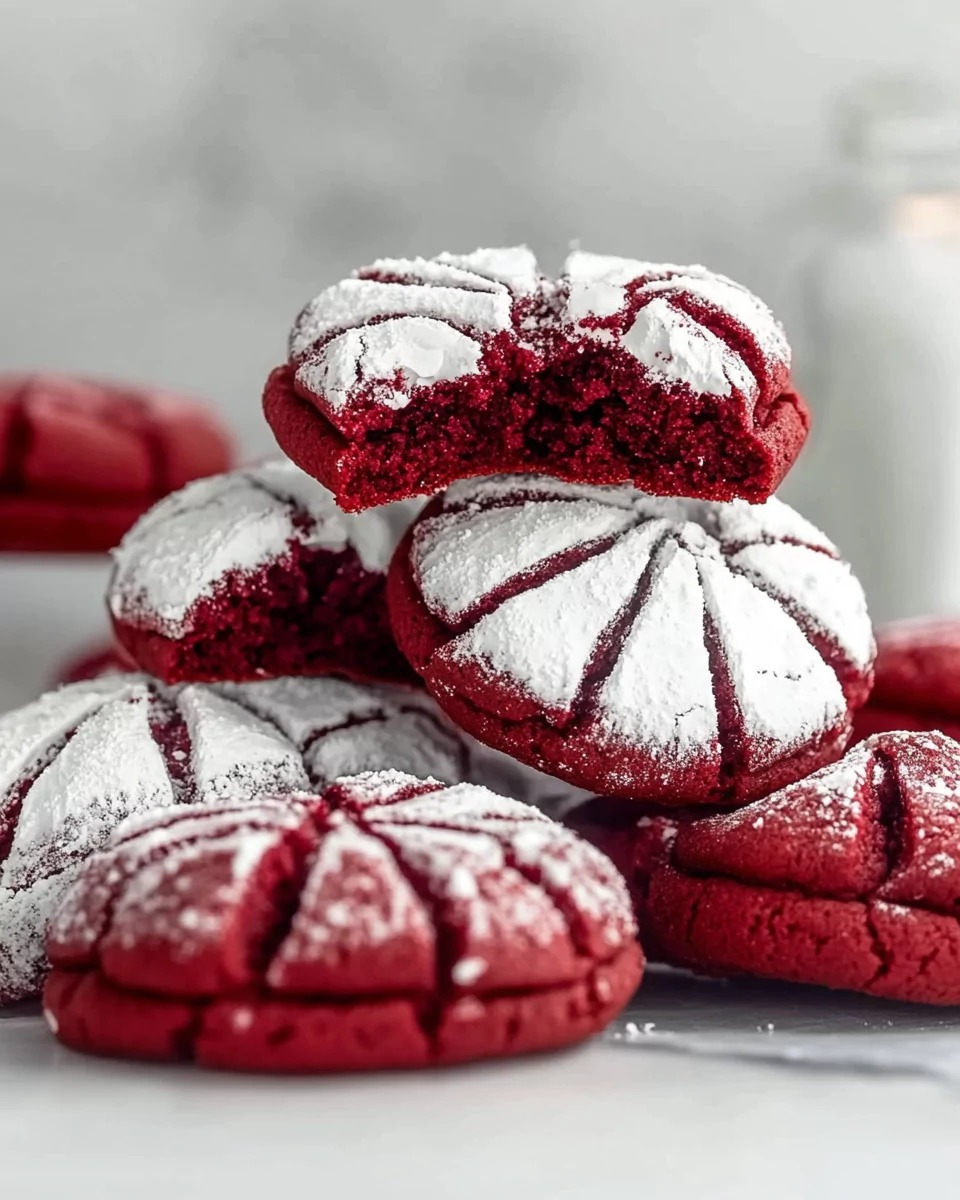
A sweet and indulgent treat, red velvet crinkle cookies combine the rich flavor of cocoa with a hint of vanilla. Their vibrant red hue and signature crackled top make them visually striking, while their soft, chewy texture keeps them utterly irresistible.
Grab This Chef Knife Now - Almost Gone!
- Stays Razor-Sharp: Ice-hardened blade keeps its edge longer than ordinary knives
- Superior Grip Control: Unique finger hole design gives you perfect balance and safety
- Built to Last a Lifetime: Premium stainless steel blade with elegant beech wood handle
Customer Reviews ★★★★★
These cookies are perfect for holidays, special occasions, or whenever you’re craving a decadent dessert. The contrast between the deep red dough and the snowy white powdered sugar coating creates a stunning effect, making them as beautiful as they are delicious.
Why You’ll Love This Recipe
- Perfect texture – Crisp on the outside, soft and fudgy on the inside.
- Festive and eye-catching – Great for Christmas, Valentine’s Day, or gifting.
- Easy to make – Simple ingredients and straightforward steps.
- Rich cocoa flavor – A subtle chocolate taste with a hint of vanilla.
Preparation Phase & Tools to Use
Before diving into the baking process, gathering the right tools and ingredients ensures a smooth experience.
Essential Tools and Equipment
- Mixing bowls – One medium and one large for dry and wet ingredients.
- Hand mixer or stand mixer – Helps achieve a light and fluffy butter-sugar mixture.
- Whisk – To evenly combine the dry ingredients.
- Measuring cups and spoons – For precise ingredient portions.
- Rubber spatula – For scraping down the sides of the bowl.
- Parchment paper – Prevents cookies from sticking and ensures even baking.
- Baking sheets – For placing the cookie dough balls.
- Cookie scoop or spoon – Helps create uniform dough balls.
- Wire rack – Allows cookies to cool properly without becoming soggy.
Why Each Tool Matters
- Chilling the dough in the refrigerator prevents the cookies from spreading too much, ensuring a distinct crinkle effect.
- Rolling in powdered sugar ensures a thick, even coating that creates the signature crackled look when baking.
- Using parchment paper helps prevent over-browning on the bottom of the cookies.
Ingredients
Dry Ingredients:
- 1 ½ cups all-purpose flour
- ½ cup unsweetened cocoa powder
- 1 teaspoon baking powder
- ¼ teaspoon salt
Wet Ingredients:
- ½ cup unsalted butter, softened
- 1 cup granulated sugar
- 2 large eggs
- 1 teaspoon vanilla extract
- 1 tablespoon red food coloring
For Coating:
- ½ cup powdered sugar
Step-by-Step Instructions
1. Prepare for Baking
Preheat the oven to 350°F (175°C) and line two baking sheets with parchment paper. This prevents sticking and ensures even baking.
2. Mix the Dry Ingredients
In a medium bowl, whisk together flour, cocoa powder, baking powder, and salt. This evenly distributes the leavening agent and prevents clumps.
3. Cream the Butter and Sugar
In a large mixing bowl, beat the softened butter and granulated sugar using a hand or stand mixer until light and fluffy (about 2–3 minutes).
4. Add the Wet Ingredients
- Mix in the eggs one at a time, beating well after each addition.
- Stir in vanilla extract and red food coloring, ensuring the color is evenly distributed.
5. Combine the Wet and Dry Ingredients
Gradually add the dry mixture into the wet ingredients. Mix until just combined. The dough should be soft and slightly sticky.
6. Chill the Dough
Cover the dough with plastic wrap and refrigerate for at least 30 minutes. This step is crucial for maintaining the cookie shape and achieving the signature crinkle effect.
7. Form the Cookie Dough Balls
Once chilled, scoop the dough into 1-inch balls using a cookie scoop or spoon. Roll each ball between your palms for a smooth shape.
8. Coat with Powdered Sugar
Roll each dough ball generously in powdered sugar, ensuring it is fully covered. This coating is what creates the crinkle effect.
9. Bake the Cookies
- Place the coated dough balls onto the prepared baking sheets, spacing them 2 inches apart.
- Bake for 10–12 minutes, or until the cookies are set but still soft in the center.
10. Cool and Serve
- Let the cookies cool on the baking sheet for 3–5 minutes, then transfer them to a wire rack to cool completely.
- Enjoy fresh, or store for later.
Preparation Tips
- Use gel food coloring for a more vibrant red without altering the dough consistency.
- Refrigerate the dough for longer if it’s too sticky to handle.
- Coat the dough balls generously with powdered sugar for a dramatic crackle effect.
- Avoid overbaking – the cookies should still be soft in the center when removed from the oven.
Serving Suggestions
- With a Glass of Milk – The classic pairing. The creamy texture of milk balances the rich cocoa flavor.
- Alongside Coffee or Tea – A warm cup of coffee or black tea enhances the sweetness and depth of flavor.
- As an Ice Cream Sandwich – Place a scoop of vanilla or cream cheese ice cream between two cookies for a decadent dessert.
- Drizzled with White Chocolate – Melt white chocolate and drizzle it over the cookies for added sweetness and contrast.
- With Whipped Cream – A dollop of homemade whipped cream adds a light, airy texture.
- In a Dessert Platter – Pair with other holiday cookies like gingerbread, snickerdoodles, or sugar cookies.
- Crumbled Over Yogurt – Adds a crunchy, sweet topping to vanilla or Greek yogurt.
- As a Gift – Wrap in a decorative tin or box for a thoughtful homemade present.
Common Mistakes to Avoid & How to Perfect the Recipe
Even simple cookie recipes can go wrong if certain steps are skipped or overlooked. Here are the most common mistakes and how to fix them.
1. Not Chilling the Dough
Mistake: Skipping the refrigeration step causes the cookies to spread too much and lose their crinkle effect.
Fix: Always chill the dough for at least 30 minutes before rolling and baking.
2. Overmixing the Dough
Mistake: Overmixing can lead to dense or tough cookies.
Fix: Mix just until the dry ingredients are incorporated into the wet ingredients.
3. Using Too Little Powdered Sugar
Mistake: A light dusting won’t create the signature crinkle effect.
Fix: Coat the dough balls generously in powdered sugar for a thick, even layer.
4. Overbaking the Cookies
Mistake: Baking too long results in dry, hard cookies instead of soft and chewy ones.
Fix: Remove the cookies from the oven when they are just set and still soft in the center, about 10–12 minutes.
5. Using the Wrong Type of Food Coloring
Mistake: Liquid food coloring can change the consistency of the dough.
Fix: Use gel food coloring for a more vibrant red without affecting texture.
6. Measuring Flour Incorrectly
Mistake: Using too much flour makes the dough dry and heavy.
Fix: Spoon the flour into a measuring cup and level it off with a knife instead of scooping directly from the bag.
7. Skipping the Wire Rack
Mistake: Leaving cookies on the baking sheet too long can cause them to overcook.
Fix: Transfer cookies to a wire rack after a few minutes of cooling on the tray.
Side Dish Recommendations
Pairing these cookies with complementary treats can elevate the dessert experience. Here are eight side dish ideas that go well with red velvet crinkle cookies.
1. Cream Cheese Frosting Dip
A smooth, tangy cream cheese dip enhances the red velvet flavor and adds extra creaminess.
2. Hot Chocolate
A rich, velvety mug of hot cocoa complements the cookies’ cocoa flavor and adds a cozy touch.
3. Fresh Berries
Strawberries, raspberries, or blueberries add a refreshing contrast to the cookies’ sweetness.
4. Vanilla Pudding
A creamy vanilla pudding provides a silky, cool pairing to balance the chewiness of the cookies.
5. Espresso or Cappuccino
A bold espresso or foamy cappuccino enhances the deep cocoa notes in the cookies.
6. White Chocolate Mousse
A light and airy mousse complements the cookies without overpowering their flavor.
7. Raspberry Coulis
A drizzle of tart raspberry sauce adds a fruity contrast that works beautifully with red velvet.
8. Almond or Hazelnut Spread
A nutty, chocolatey spread like Nutella or almond butter creates a delicious dipping option.
These pairing ideas help turn a simple cookie into a complete dessert experience, whether for a special occasion or an everyday treat.
Expert Tips for Perfect Red Velvet Crinkle Cookies
- Use High-Quality Cocoa Powder – A good-quality unsweetened cocoa powder enhances the rich, chocolatey flavor.
- Don’t Skip the Chilling Step – Refrigerating the dough for at least 30 minutes makes it easier to handle and helps achieve the signature crinkle effect.
- Generously Coat with Powdered Sugar – A thick layer ensures dramatic cracks and a beautiful contrast against the red dough.
- Avoid Overbaking – Bake just until the cookies are set but still soft in the center. They will continue firming up as they cool.
- Measure Ingredients Correctly – Use the spoon-and-level method for flour to avoid dense cookies.
- Experiment with Flavors – Try adding a pinch of cinnamon, espresso powder, or a few chocolate chips for a unique twist.
Storage & Reheating Instructions
Short-Term Storage (Room Temperature)
- Store cookies in an airtight container at room temperature for up to 5 days.
- Place a small piece of bread inside the container to keep the cookies soft.
Refrigerating the Dough
- If making ahead, store the cookie dough in the fridge for up to 2 days before baking.
- Let the dough sit at room temperature for 10 minutes before rolling and coating in powdered sugar.
Freezing Instructions
Freezing Baked Cookies
- Store in a freezer-safe bag or airtight container for up to 3 months.
- Thaw at room temperature for 15–20 minutes before enjoying.
Freezing Cookie Dough
- Roll the dough into balls (before coating in powdered sugar) and freeze on a baking sheet until firm.
- Transfer to a freezer-safe bag and store for up to 3 months.
- When ready to bake, let the dough sit for a few minutes, roll in powdered sugar, and bake as usual.
FAQs – Frequently Asked Questions
Why didn’t my cookies crinkle?
If your cookies didn’t develop cracks, the dough was likely too warm. Make sure to chill it for at least 30 minutes before baking.
Can I make these cookies without cocoa powder?
Cocoa powder is essential for the red velvet flavor, but you can reduce it slightly if you prefer a milder taste.
Do I have to use gel food coloring?
Gel food coloring is best for vibrant color without altering the dough consistency. Liquid food coloring may require extra flour to balance the moisture.
Can I freeze the cookies after baking?
Yes. Let them cool completely, then store in a freezer-safe container for up to 3 months.
Can I double this recipe?
Absolutely. Simply double all ingredients and follow the same steps. You may need to bake in batches.
Can I use powdered sugar substitutes for coating?
You can try granulated sugar for a slightly different texture, but powdered sugar gives the best crinkle effect.
Can I use margarine instead of butter?
Butter is recommended for the best flavor and texture, but you can use margarine if needed. The texture may be slightly different.
Why are my cookies dry?
Overbaking or too much flour can cause dryness. Make sure to bake for only 10–12 minutes and measure flour correctly.
Conclusion
These red velvet crinkle cookies are the perfect combination of beauty and indulgence. With their deep red color, rich cocoa flavor, and soft, chewy texture, they make a standout treat for any occasion.
Whether you’re making them for a holiday, a gift, or just to satisfy a sweet craving, this recipe ensures foolproof results every time. Try fun variations like adding chocolate chips, nuts, or even a cream cheese filling for an extra-special twist.
Happy baking!
Red Velvet Crinkle Cookies
Ingredients
- 1 1/2 cups all-purpose flour
- 1/2 cup unsweetened cocoa powder
- 1 teaspoon baking powder
- 1/4 teaspoon salt
- 1/2 cup unsalted butter softened
- 1 cup granulated sugar
- 2 large eggs
- 1 teaspoon vanilla extract
- 1 tablespoon red food coloring
- 1/2 cup powdered sugar for rolling
Instructions
- In a medium bowl, whisk together the flour, cocoa powder, baking powder, and salt to create the dry mixture.
- In a large mixing bowl, beat the softened butter and granulated sugar until light and fluffy, about 2–3 minutes.
- Add the eggs one at a time, beating well after each addition. Mix in the vanilla extract and red food coloring until evenly combined.
- Gradually incorporate the dry mixture into the wet ingredients, mixing just until combined. The dough will be soft and slightly sticky.
- Cover the dough and refrigerate for at least 30 minutes. Chilling helps make the dough easier to handle and ensures the cookies hold their shape.
- Scoop chilled dough into 1-inch balls. Roll each ball generously in powdered sugar, coating completely. Place the balls on the prepared baking sheets, leaving about 2 inches of space between them.
- Bake for 10–12 minutes, until the cookies are set but still soft in the center. They should have a distinctive crackled top.
- Allow the cookies to cool on the baking sheet for a few minutes before transferring them to a wire rack to cool completely.
Notes
Store in an airtight container for up to 5 days, or freeze for longer storage.
Feel free to experiment with other food coloring shades for different occasions!



Leave a Comment