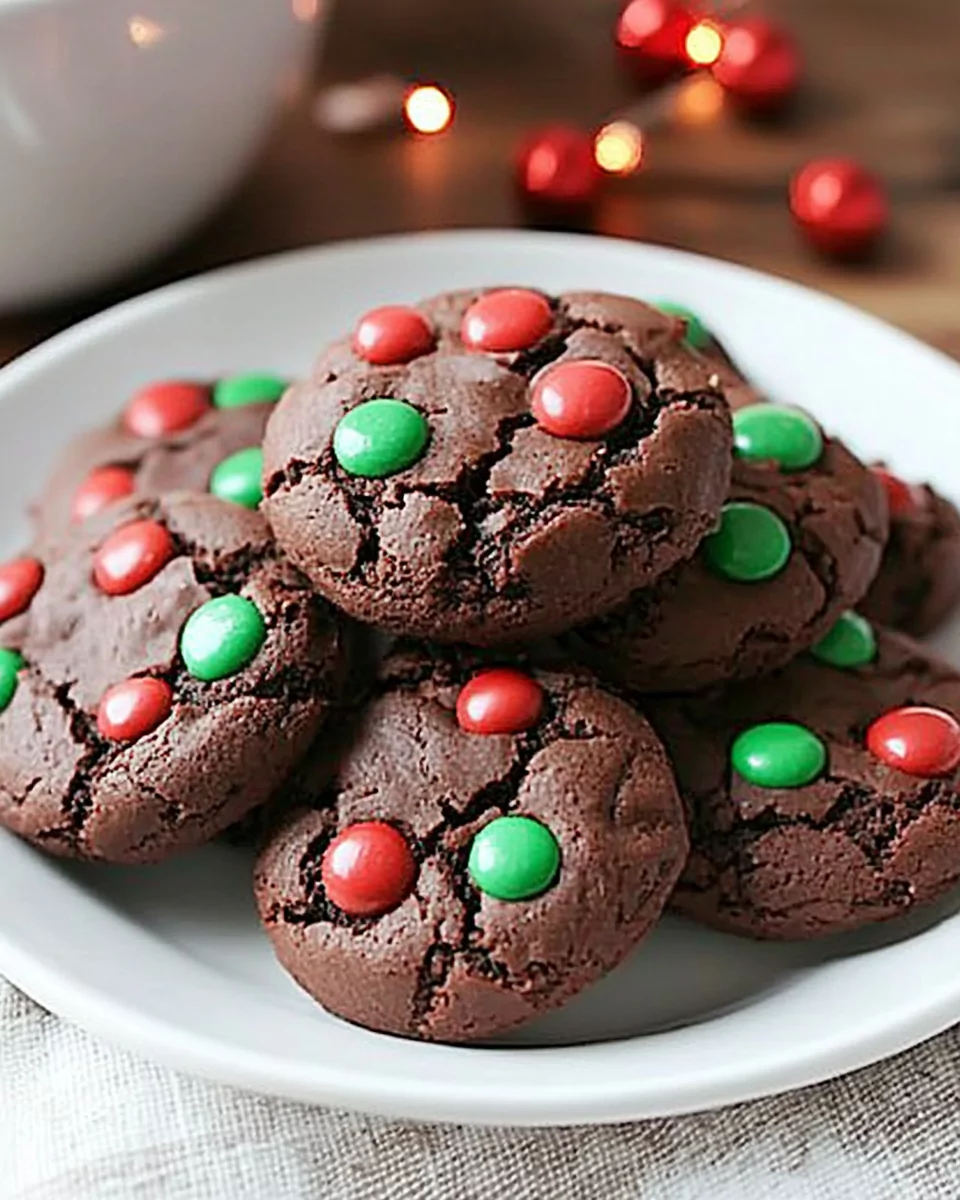
Cake Mix Christmas Cookies are the ultimate holiday hack for bakers of all skill levels. With just a handful of ingredients and minimal prep time, you can whip up a batch of chewy, chocolatey cookies that scream Christmas spirit. These cookies are not only delicious but also highly versatile. Whether you’re preparing for a cookie swap, hosting a holiday party, or simply satisfying a seasonal sweet tooth, this recipe is bound to impress.
Grab This Chef Knife Now - Almost Gone!
- Stays Razor-Sharp: Ice-hardened blade keeps its edge longer than ordinary knives
- Superior Grip Control: Unique finger hole design gives you perfect balance and safety
- Built to Last a Lifetime: Premium stainless steel blade with elegant beech wood handle
Customer Reviews ★★★★★
Why You’ll Love These Cookies
- Effortless: Made with a cake mix base, they save time without compromising taste.
- Customizable: Add your favorite festive touches like peppermint, nuts, or holiday-colored candies.
- Crowd-Pleasing: Soft, chewy, and bursting with chocolatey goodness, these cookies are sure to disappear fast.
Preparation Phase & Tools to Use
Essential Tools and Equipment
- Large Mixing Bowl: To combine all ingredients with ease.
- Quarter Sheet Pan: Perfect for baking a small batch and evenly distributing heat.
- Cooling Rack: Ensures the cookies cool evenly and retain their texture.
Importance of Each Tool
- Mixing Bowl: Provides ample space for thorough mixing without spills.
- Sheet Pan: Prevents overcrowding, which helps cookies bake evenly.
- Cooling Rack: Prevents soggy bottoms by allowing air to circulate.
Preparation Tips
- Preheat your oven to 350°F to ensure consistent baking.
- Use room-temperature eggs for a smoother dough.
- Line your sheet pan with parchment paper if desired for easier cleanup.
Ingredients You’ll Need
- 1 box (15.25 oz) chocolate cake mix (or Devil’s Food for a richer, deeper chocolate flavor)
- 1/3 cup vegetable oil: Adds moisture and ensures soft cookies.
- 1 teaspoon vanilla extract: Enhances the flavor profile.
- 2 large eggs: Binds the ingredients together.
- 1 cup M&M candies or chocolate chips: Adds bursts of chocolatey sweetness.
Step-by-Step Directions
1. Preheat the Oven
Set your oven to 350°F (175°C). This step ensures your cookies bake evenly from start to finish.
2. Make the Dough
- In a large mixing bowl, combine the chocolate cake mix, vegetable oil, vanilla extract, and eggs.
- Stir together until the dough is thick and smooth.
- Fold in M&M candies or chocolate chips for a festive touch.
3. Form the Cookies
- Roll the dough into 1-inch balls using your hands or a cookie scoop.
- Place the dough balls on an ungreased baking sheet, spacing them about 2 inches apart to prevent spreading.
4. Bake
- Bake for 9-11 minutes, keeping an eye on the edges, which should be set while the centers remain soft.
- Remove from the oven and allow the cookies to cool on the baking sheet for 2-3 minutes.
- Transfer the cookies to a cooling rack and let them cool completely.
Pro Tips and Variations
- Festive Additions: Swap M&Ms for crushed candy canes, chopped peppermint bark, or dried cranberries.
- Presentation Upgrade: Drizzle cooled cookies with melted white chocolate or sprinkle them with powdered sugar.
- Storage Tip: Store cookies in an airtight container to keep them soft and fresh for up to a week.
Serving Suggestions for Cake Mix Christmas Cookies
These Cake Mix Christmas Cookies are perfect for a variety of occasions, from cozy nights by the fire to festive holiday gatherings. Here are some creative and delightful ways to serve them:
- Holiday Dessert Platters: Arrange them alongside other festive treats like fudge, peppermint bark, and sugar cookies.
- Cookie Swaps: These cookies are quick to make, making them ideal for sharing during holiday cookie exchanges.
- Paired with Hot Drinks: Serve with mugs of hot chocolate, mulled cider, or spiced eggnog for a cozy pairing.
- Gifting Idea: Package them in decorative tins or bags as thoughtful edible gifts for neighbors and friends.
Common Mistakes to Avoid and How to Perfect the Recipe
Mistakes to Avoid
- Overmixing the Dough: This can lead to tough cookies. Mix just until ingredients are combined.
- Overbaking: These cookies can go from perfectly soft to overcooked in seconds. Remove them when the edges are set, even if the centers look slightly underdone.
- Crowding the Pan: Too many cookies on a sheet can lead to uneven baking. Leave at least 2 inches of space between cookies.
How to Perfect the Recipe
- Use a cookie scoop to ensure uniform-sized cookies that bake evenly.
- Opt for holiday-themed M&Ms or sprinkles to give the cookies a festive flair.
- Allow the cookies to cool on the baking sheet for a few minutes to prevent breakage when transferring.
Side Dish Recommendations
Pair these cookies with complementary dishes to create a full holiday spread. Here are some side dishes that make the perfect companions to your cookies:
1. Hot Chocolate
A rich, creamy mug of hot chocolate topped with whipped cream or marshmallows pairs wonderfully with the chewy cookies.
2. Mulled Cider
The warm, spiced notes of mulled cider balance the sweetness of the cookies for a cozy holiday vibe.
3. Eggnog
Traditional eggnog adds a creamy, festive touch when served alongside these cookies.
4. Festive Cheesecake Bites
Mini cheesecake bites with a hint of peppermint or cranberry offer a creamy contrast to the cookies’ chewy texture.
5. Cranberry Orange Bread
The tart, citrusy flavors of cranberry orange bread complement the rich chocolatey cookies.
6. Charcuterie Board
Create a dessert-style charcuterie board with dried fruits, nuts, chocolates, and your cookies as the centerpiece.
7. Spiced Nuts
Candied or spiced nuts provide a crunchy, flavorful side to enjoy alongside your cookies.
8. Ice Cream Sundaes
Crumble the cookies over a bowl of vanilla or peppermint ice cream for a decadent dessert.
Recipe Tips for Perfect Cake Mix Christmas Cookies
Follow these tips to ensure your cookies are picture-perfect and delicious every time:
- Choose Quality Ingredients: Use a high-quality chocolate cake mix for the best flavor.
- Room-Temperature Eggs: These mix more easily, creating a smoother dough.
- Chill the Dough (Optional): For thicker cookies, chill the dough for 15–20 minutes before rolling into balls.
- Creative Add-Ins: Experiment with white chocolate chips, crushed candy canes, or dried cranberries for variety.
Storage and Reheating Instructions
Storing the Cookies
- Store cookies in an airtight container at room temperature for up to 7 days.
- To prevent sticking, layer parchment paper between cookie layers.
Freezing the Dough
- Roll the dough into balls and freeze them on a baking sheet until solid.
- Transfer the frozen dough balls to a freezer-safe bag or container. Label with the date and freeze for up to 3 months.
Reheating or Refreshing the Cookies
- Warm cookies in the microwave for 10–15 seconds to restore their soft, chewy texture.
Frequently Asked Questions (FAQs)
1. Can I use a different type of cake mix?
Yes! While chocolate cake mix is classic, you can experiment with vanilla, red velvet, or even spice cake mix for a fun twist.
2. How do I prevent my cookies from spreading too much?
Ensure your dough isn’t overly warm. Chilling the dough for 15–20 minutes before baking helps prevent excessive spreading.
3. Can I make these cookies gluten-free?
Absolutely! Substitute with a gluten-free chocolate cake mix to make this recipe gluten-free.
4. What other mix-ins can I use?
Try peanut butter chips, toffee bits, or crushed pretzels for added texture and flavor.
5. Can I make the dough ahead of time?
Yes, you can prepare the dough up to 24 hours in advance. Store it in the refrigerator until ready to bake.
6. Why are my cookies dry?
Dry cookies may result from overbaking. Remove them from the oven when the edges are set, even if the centers seem slightly underdone.
7. Can I double the recipe?
Certainly! Simply double all the ingredients and bake in batches as needed.
Conclusion
Cake Mix Christmas Cookies are the ultimate holiday baking shortcut. They’re simple, festive, and endlessly customizable, making them a go-to treat for any holiday occasion. Whether you enjoy them fresh from the oven, pair them with your favorite seasonal drinks, or gift them to loved ones, these cookies are guaranteed to spread holiday cheer.
Ready to bake your way into the season? Give these Cake Mix Christmas Cookies a try and let the festivities begin! 🎄🍪


Leave a Comment